
| Darin McQuoid | Blog | Reviews | Tutorials | River Directory |
Whitewater
Photography Tutorial #5: Focus.
The
second technical detail is focusing on the subject of the photograph. As
technology has marched forward focusing correctly has gotten harder.
Wait what? As much as sensor technology has advanced, focusing
capability has not progressed at the same speed. What worked in 2005
with 6 megapixel APS-C sensors does not today with 20+ megapixel full
frame sensors. Auto-focusing, self explanatory and commonly referred to
as AF.
Cameras have either Contrast AF or Phase Detect AF. Although there are cameras with both, as a general rule of thumb point & shoot and mirrorless cameras have Contrast AF while SLR cameras have Phase Detect AF. Contrast AF is more accurate but slower, while Phase detect is faster, less accurate and currently unparalleled for tracking an object.
In most cameras there are two primary AF modes. The first mode is a closed loop; it focuses once on the object under the AF sensor and stops until the shutter button is released and pushed again. Nikon and Sony call this AF-S short for for Auto Focus Single while Canon calls it One Shot. The second mode is an open loop; it continues to focus on the object under the AF sensor until the shutter button is released. Nikon and Sony call this AF-C, short for for Auto Focus Continuous while Canon calls it AI Servo because they are still stuck using nomenclature from 1980. As one climbs camera hierarchy in any brand the options are more complex and confusing, we'll get to a little of that later and just stick with these two modes for now.
With a contrast based AF system you're simply not tracking action. I suggest that if you own a camera with contrast AF it's best to set the focus to AF-S, focus on where the paddler will be in the frame and recompose, taking the picture when the paddler moves to where the focus was set. Then skip the rest of this section as it's pretty specific to Phase Detect AF.
Phase Detect AF is wonderful, frustrating and complicated. A lot goes on "under the hood". Phase Detect AF needs straight lines to focus, and there are two types of AF sensors; the most common are vertical line sensors, which are good at focusing on horizontal lines. Cross type sensors are two dimensional and more accurate. It's common for cheaper cameras to only have one cross type point in the center, while a more expensive camera like Nikon's D4 will have 15 cross type sensors. Now things get a little complicated. The D4 has 51 AF sensors, but only 15 of those are cross type. Looking through the viewfinder they all look the same. Don't worry, they are all in the center anyways. Despite all the technological advances in the last ten years, they have not worked out how to get accurate phase detect focus points to work towards the edge of the frame. It just can't be summed up easily, even by the people who make it.
Do the research and see which phase detect sensors on your camera are cross type, and try to use only those. Why choosing to show only cross point AF points isn't an option is a sad oversight by all the camera makers.
Phase detect auto focusing is most accurate when the camera is set to continuous auto focusing. Now it's impossible compose the shot unless your subject falls under one of those limited cross type AF points. Thankfully there is a solution, and it's known as AF-ON. Only higher end cameras have a dedicated AF-ON button, but even consumer models allow the Auto Exposure Lock (AEL) button to be reprogrammed to AF-ON. Turning on AF-ON switches AF activation from the shutter button to the dedicated button. Now it's possible to focus continually by pressing the AF-ON button and stop focusing by releasing the button. Then you can recompose and take a photo without the shutter button activating the AF system.
The focus and recompose method works well for wider angle shots, barring any issues from field curvature. But what about when there is nothing to focus on before recomposing?
There are other kinds of complicated focusing modes, but in reality with kayaking we're tracking one object moving in a predictible path.
Next Up: Lighting.
Whitewater Photography Tutorial #1: Intro.
Whitewater Photography Tutorial #2: What is the right exposure?
Whitewater Photography Tutorial #3: Getting the right exposure.
Whitewater Photography Tutorial #4: Low Light Action
Whitewater Photography Tutorial #5: Focus
Whitewater Photography Tutorial #6: Lighting
Whitewater Photography Tutorial #7: Composition
Whitewater Photography Tutorial #8: Wide Angles
Whitewater Photography Tutorial #9: Panning
Whitewater Photography Tutorial #10: Post-processing
Whitewater Photography Tutorial #11: Sequencing
Cameras have either Contrast AF or Phase Detect AF. Although there are cameras with both, as a general rule of thumb point & shoot and mirrorless cameras have Contrast AF while SLR cameras have Phase Detect AF. Contrast AF is more accurate but slower, while Phase detect is faster, less accurate and currently unparalleled for tracking an object.
In most cameras there are two primary AF modes. The first mode is a closed loop; it focuses once on the object under the AF sensor and stops until the shutter button is released and pushed again. Nikon and Sony call this AF-S short for for Auto Focus Single while Canon calls it One Shot. The second mode is an open loop; it continues to focus on the object under the AF sensor until the shutter button is released. Nikon and Sony call this AF-C, short for for Auto Focus Continuous while Canon calls it AI Servo because they are still stuck using nomenclature from 1980. As one climbs camera hierarchy in any brand the options are more complex and confusing, we'll get to a little of that later and just stick with these two modes for now.
With a contrast based AF system you're simply not tracking action. I suggest that if you own a camera with contrast AF it's best to set the focus to AF-S, focus on where the paddler will be in the frame and recompose, taking the picture when the paddler moves to where the focus was set. Then skip the rest of this section as it's pretty specific to Phase Detect AF.
Phase Detect AF is wonderful, frustrating and complicated. A lot goes on "under the hood". Phase Detect AF needs straight lines to focus, and there are two types of AF sensors; the most common are vertical line sensors, which are good at focusing on horizontal lines. Cross type sensors are two dimensional and more accurate. It's common for cheaper cameras to only have one cross type point in the center, while a more expensive camera like Nikon's D4 will have 15 cross type sensors. Now things get a little complicated. The D4 has 51 AF sensors, but only 15 of those are cross type. Looking through the viewfinder they all look the same. Don't worry, they are all in the center anyways. Despite all the technological advances in the last ten years, they have not worked out how to get accurate phase detect focus points to work towards the edge of the frame. It just can't be summed up easily, even by the people who make it.
Do the research and see which phase detect sensors on your camera are cross type, and try to use only those. Why choosing to show only cross point AF points isn't an option is a sad oversight by all the camera makers.
Phase detect auto focusing is most accurate when the camera is set to continuous auto focusing. Now it's impossible compose the shot unless your subject falls under one of those limited cross type AF points. Thankfully there is a solution, and it's known as AF-ON. Only higher end cameras have a dedicated AF-ON button, but even consumer models allow the Auto Exposure Lock (AEL) button to be reprogrammed to AF-ON. Turning on AF-ON switches AF activation from the shutter button to the dedicated button. Now it's possible to focus continually by pressing the AF-ON button and stop focusing by releasing the button. Then you can recompose and take a photo without the shutter button activating the AF system.
Here
I used the AF-ON button with focusing set to AF-C mode and the center
focus point, pointed at the lip of the falls. Then I recomposed the
shot where the lip of the falls is way out of the range of any AF
sensors.

Nikon D600, Nikkor 24-85mm VR at 24mm
Nikon D600, Nikkor 24-85mm VR at 24mm
The focus and recompose method works well for wider angle shots, barring any issues from field curvature. But what about when there is nothing to focus on before recomposing?
- Depth of Field, (DOF) is the distance between the nearest and farthest objects in a scene that appear acceptably sharp in an image. It's good to understand and wikipedia has a tedious article on it.
Shot
with a shallow depth of field using the tracking method.
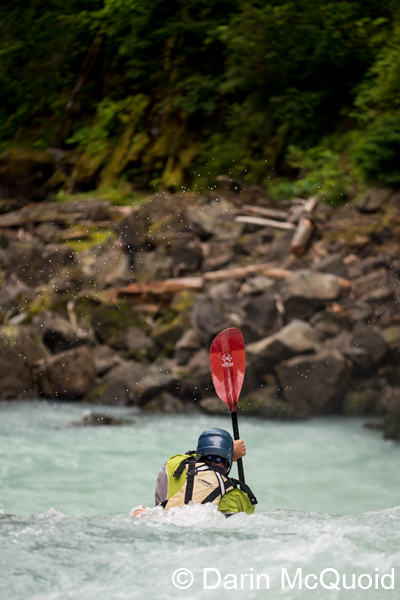
Nikon D600, Sigma 150mm f/2.8 @ f/2.8
Nikon D600, Sigma 150mm f/2.8 @ f/2.8
There are other kinds of complicated focusing modes, but in reality with kayaking we're tracking one object moving in a predictible path.
Next Up: Lighting.
Whitewater Photography Tutorial #1: Intro.
Whitewater Photography Tutorial #2: What is the right exposure?
Whitewater Photography Tutorial #3: Getting the right exposure.
Whitewater Photography Tutorial #4: Low Light Action
Whitewater Photography Tutorial #5: Focus
Whitewater Photography Tutorial #6: Lighting
Whitewater Photography Tutorial #7: Composition
Whitewater Photography Tutorial #8: Wide Angles
Whitewater Photography Tutorial #9: Panning
Whitewater Photography Tutorial #10: Post-processing
Whitewater Photography Tutorial #11: Sequencing
Comment
Box is loading comments...