| Darin McQuoid | Blog | Reviews | Tutorials | River Directory |
Whitewater
Photography Tutorial #9: Panning.
It's a cloudy day, you're
out on the river and want to get some great photographs, but you're a
casual photographer who is just using a kit lens on an affordable dSLR
camera. You can try to freeze action with wide open apertures or
high ISO and deal with either soft images and noise, or you can pan. A
panning shot is an action shot where the the subject if followed
through the action, freezing the subject while blurring the background.
Rudy told me to start take panning shots to expand the variety of my portfolio, and suggested 1/60th of a second shutter speeds for panning shots. I've found this to be dead on.
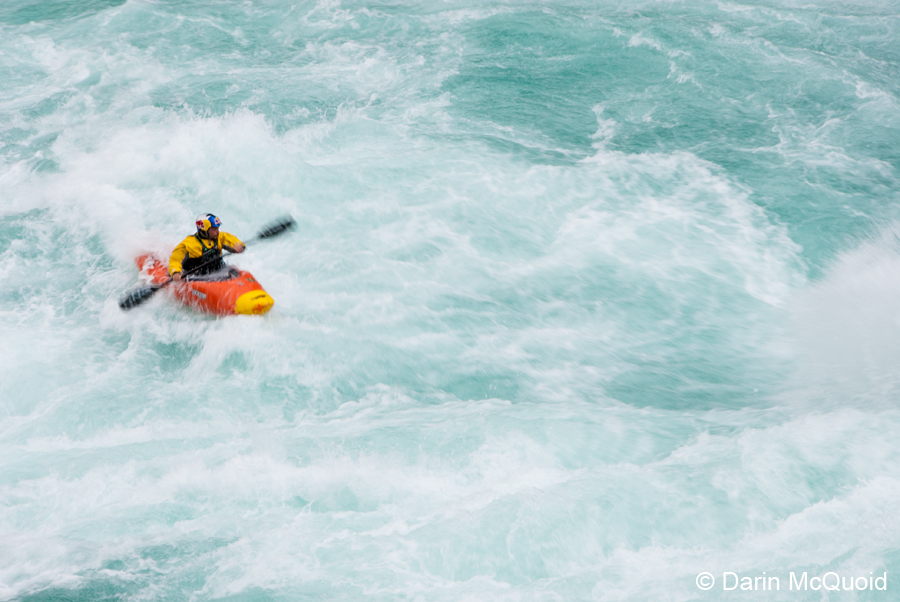
Set your shutter at 1/60th, choose your lowest ISO and adjust your aperture so your histogram comes out correct. Set the camera to Auto focus-Continuous (AF-C) mode and choose a side sensor. Once again here we want to remember to keep the subject to the side of the frame (not the center) and to give them somewhere to go in the image. In this circumstance Daniel was moving from left to right, so I chose a sensor on the left. Once he started dropping in I followed him with my focus on the whole time, and once he was at the lip I started shooting, following him through the rapid. End result: His face is in focus because I was panning at the same speed, while everything else is blurred.
A few things worth noting. The longer the lens, the more pronounced the blur will be, as it dramatically emphasizes movement. The longer the lens, the harder it is to get any shot without blur at all, due to the same problem. If your shooting a 200mm increasing the shutter speed a slight amount will help, or turn on VR/IS if you have it, because it's worth noting that this is an area where a VR/IS lens will help out. On a Nikon VR lenses be sure the lens is in the "normal" VR mode not "active" to if it has that option. This will turn off the VR from reducing panning blur.
Up Next: Post-Processing.
Whitewater Photography Tutorial #1: Intro.
Whitewater Photography Tutorial #2: What is the right exposure?
Whitewater Photography Tutorial #3: Getting the right exposure.
Whitewater Photography Tutorial #4: Low Light Action
Whitewater Photography Tutorial #5: Focus
Whitewater Photography Tutorial #6: Lighting
Whitewater Photography Tutorial #7: Composition
Whitewater Photography Tutorial #8: Wide Angles
Whitewater Photography Tutorial #9: Panning
Whitewater Photography Tutorial #10: Post-processing
Whitewater Photography Tutorial #11: Sequencing
Rudy told me to start take panning shots to expand the variety of my portfolio, and suggested 1/60th of a second shutter speeds for panning shots. I've found this to be dead on.
Set your shutter at 1/60th, choose your lowest ISO and adjust your aperture so your histogram comes out correct. Set the camera to Auto focus-Continuous (AF-C) mode and choose a side sensor. Once again here we want to remember to keep the subject to the side of the frame (not the center) and to give them somewhere to go in the image. In this circumstance Daniel was moving from left to right, so I chose a sensor on the left. Once he started dropping in I followed him with my focus on the whole time, and once he was at the lip I started shooting, following him through the rapid. End result: His face is in focus because I was panning at the same speed, while everything else is blurred.
Daniel Brasuel Nikon D700, Nikkor
50mm 1.8 @ 1/60 F11 ISO 100


A few things worth noting. The longer the lens, the more pronounced the blur will be, as it dramatically emphasizes movement. The longer the lens, the harder it is to get any shot without blur at all, due to the same problem. If your shooting a 200mm increasing the shutter speed a slight amount will help, or turn on VR/IS if you have it, because it's worth noting that this is an area where a VR/IS lens will help out. On a Nikon VR lenses be sure the lens is in the "normal" VR mode not "active" to if it has that option. This will turn off the VR from reducing panning blur.
Rafa
Ortiz, Siang River. Nikon D200, Nikkor 18-200 @ 105mm 1/50 f/11
ISO 100


Up Next: Post-Processing.
Whitewater Photography Tutorial #1: Intro.
Whitewater Photography Tutorial #2: What is the right exposure?
Whitewater Photography Tutorial #3: Getting the right exposure.
Whitewater Photography Tutorial #4: Low Light Action
Whitewater Photography Tutorial #5: Focus
Whitewater Photography Tutorial #6: Lighting
Whitewater Photography Tutorial #7: Composition
Whitewater Photography Tutorial #8: Wide Angles
Whitewater Photography Tutorial #9: Panning
Whitewater Photography Tutorial #10: Post-processing
Whitewater Photography Tutorial #11: Sequencing