
| Darin McQuoid | Blog | Reviews | Tutorials | River Directory |
Whitewater
Photography Tutorial #2: What is the right exposure?
Before moving on let's cover four technical terms that will come up a lot.
Stop: The first is a "stop". Stops are a reference to a measured specific amount of light that is consistent throughout the range of light and in all equipment. Like a pound or kilogram in weight, but for light.
Shutter Speed: This is how fast the shutter opens, exposes the sensor to light and closes. The faster it moves, the less light the sensor receives. Faster shutter speeds stop action because very little movement happens during the brief moment it's open. Slower shutter speeds expose the sensor to more light, but moving objects will blur because they change position while the shutter is open. As a general rule of thumb I consider 1/500 the absolute minimum while trying to freeze action. I try to keep it from 1/800 to 1/2000.
Aperture: The size of the opening in the lens. It is adjustable just like your shutter speed and the second means of controlling the amount of light reaching the sensor. The numbering seems backwards at first, because the smaller the number, the larger the opening (letting in more light) and the larger number is of course a smaller opening. Your maximum aperture will vary depending on the lens, the chosen Aperture is often referred to as F-stop or F plus Aperture number. For example F5.6.
ISO: Once known as ASA, ISO speed is the digital equivalent to film speed. This is the third way of adjusting a exposure. Lower ISO speeds absorb less light than higher ISO but retain better detail and less noise. As a rule of thumb keep your ISO as low as possible for the situation. On stop of ISO is always double, such as from 100 to 200, or 400 to 800.
If a shot is too dark you can either slow down your shutter speed by one stop, or open your aperture one stop, or speed up your ISO by one stop. Choosing which one to adjust is the key of control in photography. Adjusting any one of these three one stop will increase your exposure the same exact amount. For fine tuning, modern digital cameras can adjust in 1/3, 1/2 or full stops depending on user preference.
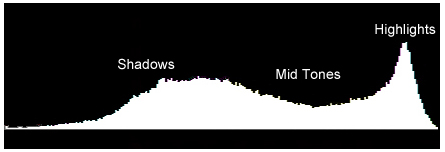
So we have our three methods of adjusting exposure, now what is the right exposure? Generally speaking, the right exposure is when the subject (what the picture is about) is exposed correctly. In my opinion, good whitewater shots are really all about good whitewater. So I try to expose for the whitewater in the image. I do this by using the histogram on my camera. The histogram is how the camera displays the light it just captured as a graph instead of as an image.
This is the histogram graph from a typical sunny day whitewater scenario, where there is a wide range of light from the dark shadows to sun on white water. Let's say this bright sunny day that has twelve stops of light in it.
Dynamic range is a fancy way of saying how many stops of light the sensor (or film) in a camera can record. In 2005 most cameras had eight or nine stops of dynamic range. As of 2013 that's up to 13-14, and in general lack of dynamic range is a lot less of a problem now. Still at some point we will encounter a larger range of light than the camera can record. Thus a compromise must be made. If you leave your camera to it's own metering, this is how it will most often deal with a large dynamic range of light:
The
red box is the amount of light
your camera can capture. As you can see this scene has more range than
the camera is able to capture, and the camera defaults to the middle
ground.
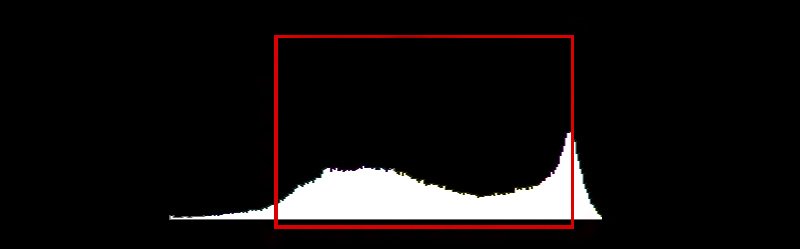
When
the range of light
extends off the left side of the graph, shadows fall to pure
black. If the graph goes past on the right, the brightest spots get
turned into
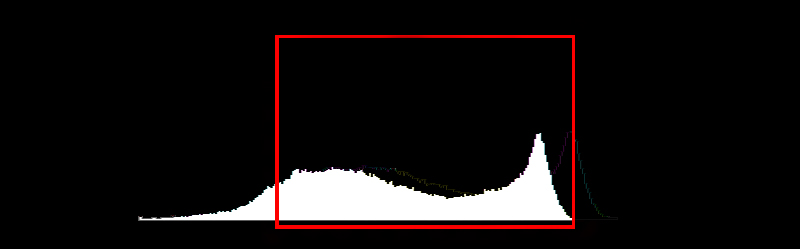
pure white. Both are happening in the above. Below we have an
exposure "exposed for the right" which works well for whitewater. More
shadow detail is lost to pure black, but this looks more natural to the
human eye than the highlights going to pure white, especially in
whitewater where the water will lose all texture if it's
over-exposed.
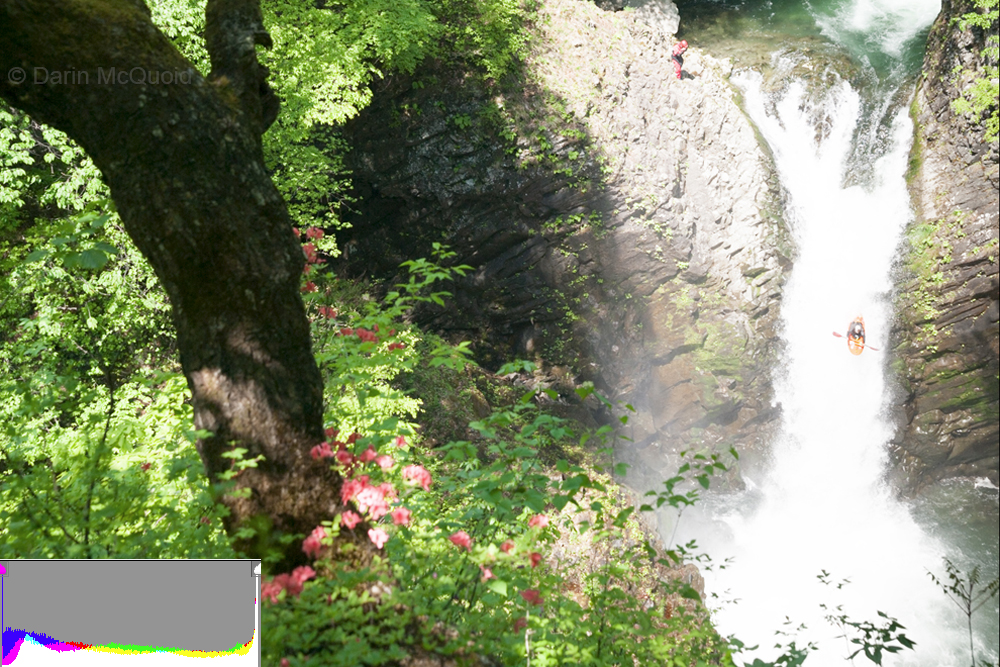
Now the water retains detail because the highlights are not pure white.
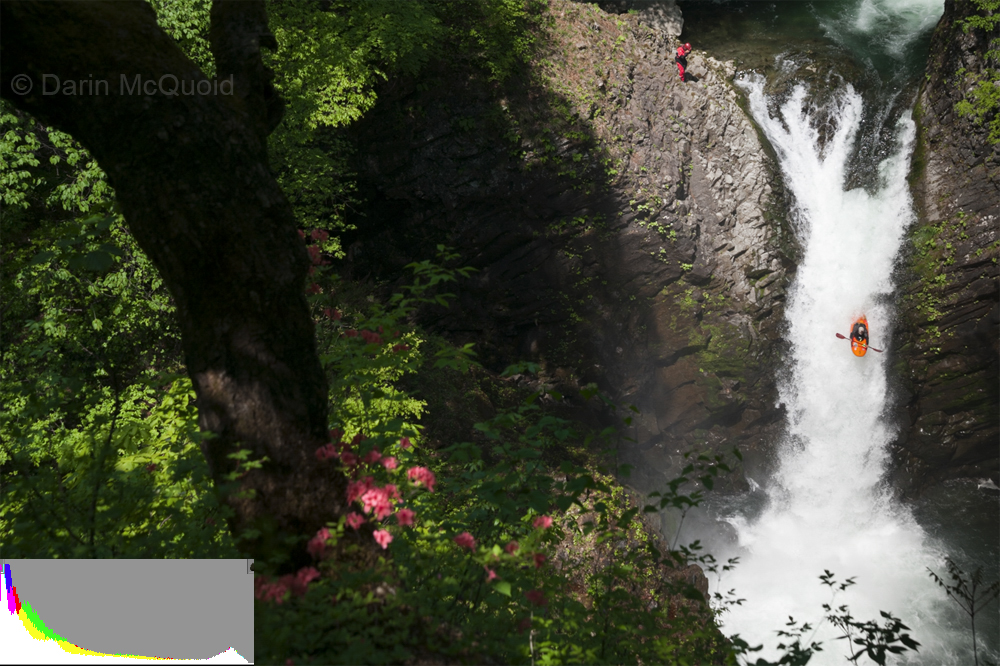
If
we expose for the right, look
how the shadows may be black but the whitewater retains texture,
histogram overlayed on the bottom left.
If the image was exposed for the left, now there is detail in the shadows but none in the bright spots, a very unnatural look.
If the image was exposed for the left, now there is detail in the shadows but none in the bright spots, a very unnatural look.
Every camera has a histogram, turn it on so that it pops up every time you review an image, or shows in live view if your camera has an electronic viewfinder. A tip for more advanced users: Digital cameras take in red, green, and blue. The histogram on most cameras only reflects the red color channel. To get a truly accurate histogram turn on the three channel histogram, so you can see if another color is overexposed.
Next Up: Getting the right exposure.
Whitewater Photography Tutorial #1: Intro.
Whitewater Photography Tutorial #2: What is the right exposure?
Whitewater Photography Tutorial #3: Getting the right exposure.
Whitewater Photography Tutorial #4: Low Light Action
Whitewater Photography Tutorial #5: Focus
Whitewater Photography Tutorial #6: Lighting
Whitewater Photography Tutorial #7: Composition
Whitewater Photography Tutorial #8: Wide Angles
Whitewater Photography Tutorial #9: Panning
Whitewater Photography Tutorial #10: Post-processing
Whitewater Photography Tutorial #11: Sequencing
Comment
Box is loading comments...