
| Darin McQuoid | Blog | Reviews | Tutorials | River Directory |
Whitewater
Photography Tutorial #4: Low Light Action.
Keeping our expose to the right rule in mind, let's move on to deep, dark canyons and rain fed rivers. Sometimes they have the most epic scenery but can be hard to photograph well. When there is not enough light to shoot our ideal settings, it's time to play a game of balance with our three previously mentioned controls, Shutter Speed, Aperture and ISO.
First we can adjust our shutter speed, because the slower the shutter the more light we let in. The problem with this is that rarely do you want motion blur in a kayaking shot. I consider my slowest acceptable shutter speed to be 1/500 to 1/800 depending on the situation. You will have to judge this based on the speed of the paddler and water. If you are freezing motion at the top of a waterfall, both the paddler and water will be going slow enough that 1/500 might work (although paddle blades can blur).
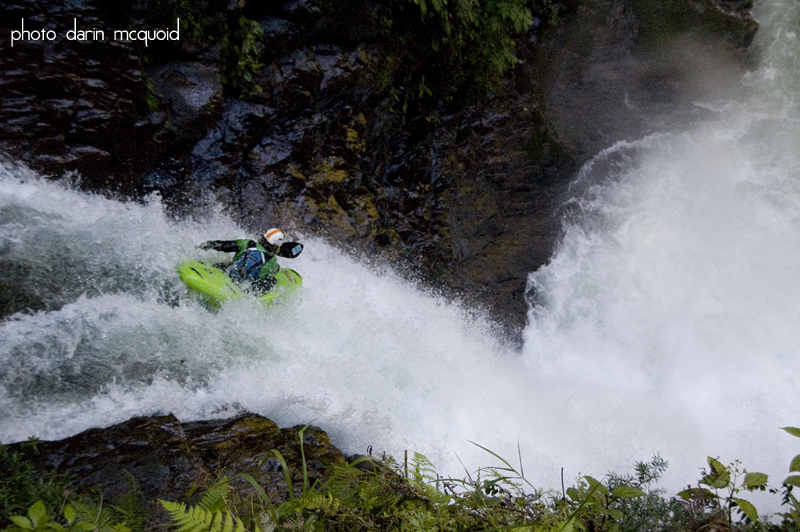
Here the paddler
is nice and
crisp both the paddle blade and splashes make it feel soft overall.

Nikon D200. Nikkor 18-200 @ 70mm 1/500 f/5 ISO 500
Nikon D200. Nikkor 18-200 @ 70mm 1/500 f/5 ISO 500
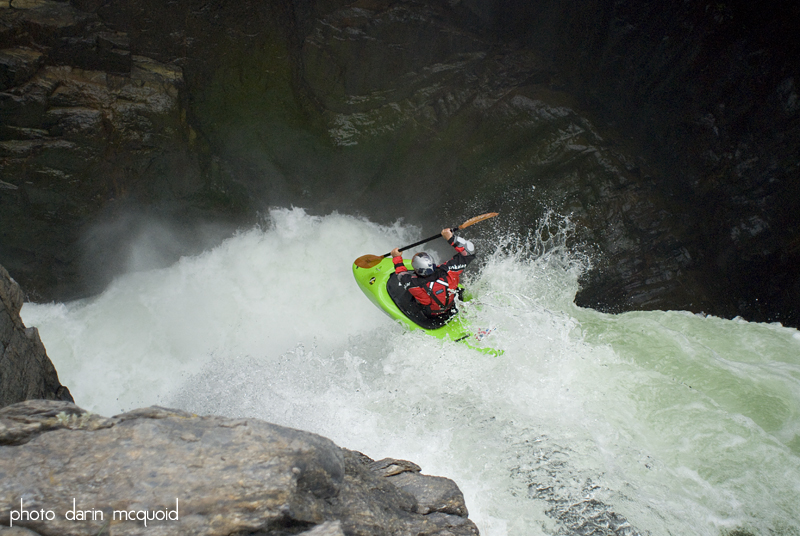
On the other hand, if you are trying to freeze action at the bottom of a waterfall, it's will be moving much faster and harder to freeze, and thus will blur. Shutter speed is the weakest of the three methods for adjusting exposure on dark days, because you only gain one stop of light going from 1/1000 to 1/500.
ISO, the equivalent of film speed, will play a role on dark days but has some serious drawbacks. Noise, the digital equivalent to film grain (often looking worse) is the most well known drawback. Outside of noise, using a high ISO also drops your dynamic range and the sensors ability to correctly capture color and texture. But there are occasions where there is no other option than to pump the ISO up. This is where they amount of money spent on a camera can make a big difference. If you are shooting at your camera's base ISO you have quite a bit of flexibility to adjust the exposure on a computer after the fact. In darker light make sure not to under-expose a high ISO shot. At high ISO any noise is greatly magnified if you adjust the exposure, and this can ruin the shot.
Example One:
Shutter:
1/1000. Aperture: F4.8. ISO: 800. Post production +2.5 exposure.
Example Two: Shutter: 1/640. Aperture: F2.8. ISO: 800 Post production +.25 exposure.
Example Two: Shutter: 1/640. Aperture: F2.8. ISO: 800 Post production +.25 exposure.
While the
difference is pretty
obvious, it's even more obvious when the images are seen at 100%:
ISO: 800, Post production +2.5 exposure

ISO: 800, Post production +2.5 exposure
ISO:
800, Post production
+.25 exposure.
Although a little bit of the sharpness loss is due to lens choice,the first illustrates the dangers of underexposing a high ISO image, look at the colored noise on the dark rock wall.
Aperture is the most powerful of the three choices. Opening the aperture from 8 to 2.8 is a full three stops. This is the same as going from ISO 200 to 1600, or 1/1000 to 1/125. There are some downsides to large apertures. Large aperture zoom lenses are expensive and heavy, because it takes a lot more glass to let in all that light. Another downside is that on many lenses the largest apertures are not as sharp and lose contrast. As a rule of thumb you can't shoot low light kayaking with a cheap zooms and get great results.
I see three basic routes that can be taken for photographing kayaking in darker conditions.
- Option #1 is to lower your standards and shoot high ISO speeds with cheap light zooms.
- Option #2 is to buy expensive fast zooms, but they run around $1,800 and weight as much as 3lbs. Plus 2.8 isn't really that fast.
- Option #3 is prime lenses. Trade away the convenience of a zoom for the lighter weight and (sometimes) cheaper cost of a prime. Prime lenses have often been in production a long time and are light and simple since they don't zoom. The $120 50mm f/1.8 is a great example. Over one full stop faster than the $1,900 24-70mm 2.8, 1.7lbs lighter and $1,600 less! The downside of shooting primes is the hassle of changing lenses on a regular basis, and more hiking to get the shot you want. Sometimes you just can't get where you'd like to be too. They are especially tough in a rainy environment, where you don't want to expose the inside of your camera body while changing lenses.
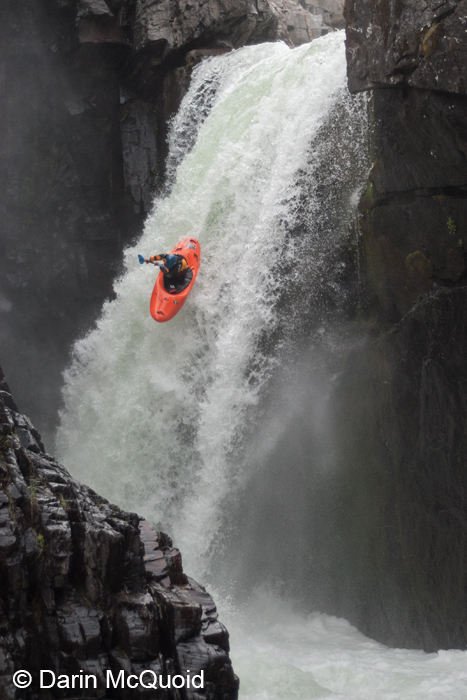
Nikon D200, Nikkor
50mm 1.8 @
1/640 F1.8 ISO 320.
The final problem with low light kayaking shots is white balance. Ever notice how most dark weather kayaking shots look "cold"? That's because when the sun is not shining there is a lot more blue light still present. There are of course a few options to remedy this problem. I strongly suggest shooting in raw and dealing with white balance issues later, and skipping the below. If you insist in shooting jpg, read on.
The first is to use a preset white balance that is built in. Shooting on a cloudy day? Hold down the WB button and rotate the command dial until you get to the cloud symbol. Same for sun or shade as there is a setting for each. The downside to this method is that it's not completely accurate as not every day has the same exact balance of light.
If you're really a masochist, it's possible to set set manual white balance with a gray card. Judging from my love of doing things the hard way (manual exposure and prime lenses) it seems like this would be right up my alley, but it's not for two reasons.
- A. It's simply too much work to set manually for every shot.
- B. It's impossible to stand in the location of the actual shot to get a true white balance, and the lighting on shore is often different.
White Balance set to cloudy on a Nikon D50.

Next Up: Locking Focus.
Whitewater Photography Tutorial #1: Intro.
Whitewater Photography Tutorial #2: What is the right exposure?
Whitewater Photography Tutorial #3: Getting the right exposure.
Whitewater Photography Tutorial #4: Low Light Action
Whitewater Photography Tutorial #5: Focus
Whitewater Photography Tutorial #6: Lighting
Whitewater Photography Tutorial #7: Composition
Whitewater Photography Tutorial #8: Wide Angles
Whitewater Photography Tutorial #9: Panning
Whitewater Photography Tutorial #10: Post-processing
Whitewater Photography Tutorial #11: Sequencing
Comment
Box is loading comments...